Add a Pay Now button to custom invoices
This explains how to add a Pay Now button to invoices that you've already customised for your business. This applies to both Invoice Payments and Opayo.
Opayo is the new name for Sage Pay.
Report layouts will include:
- The Pay Now button. This is an embedded image in the report, with a link to handle the payment using Invoice Payments. When the customer clicks the button image, they are directed to the Invoice Payments service.
- The Pay Now Message. This displays information for your customer about the payments service. You can customise this text in Invoice and Order Settings.
Tip: If you haven't yet created a custom layout, you can customise one of the default layouts provided with Sage 200. To do this, open the layout from the defaults > layouts folder. These layouts already contain a Pay Now button.
|
SOP Invoice Payment Service Provider (E-mail) SOP Invoice Payment Service Provider (E-mail Plain Paper) |
To use a Pay Now button on your own custom layout, you will need to:
Set email settings on the layout
Watch a video
You must set up the email settings for the layout in Report Designer, as all invoices with the Pay Now button must be sent to customers via email. Email settings are not set on your invoices by default.
If you've already added email settings to your custom layouts, then you can skip this step.
Open: ![]() Tools > Run Sage Report Designer, to open Report Designer.
Tools > Run Sage Report Designer, to open Report Designer.
-
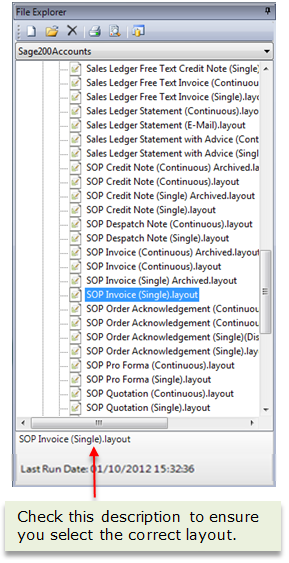
Select the SOP Invoice layout that you want to use: File Explorer > Layouts.
Custom layouts that you've already saved can be found in custom > layouts or company > layouts folder.
-
Select Report > Email settings from the toolbar, to set the report email settings.
-
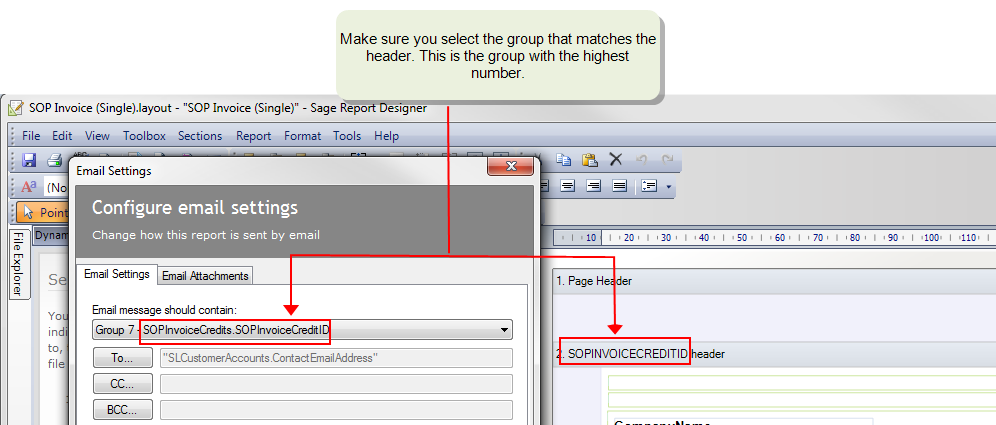
Choose the header section of the layout.
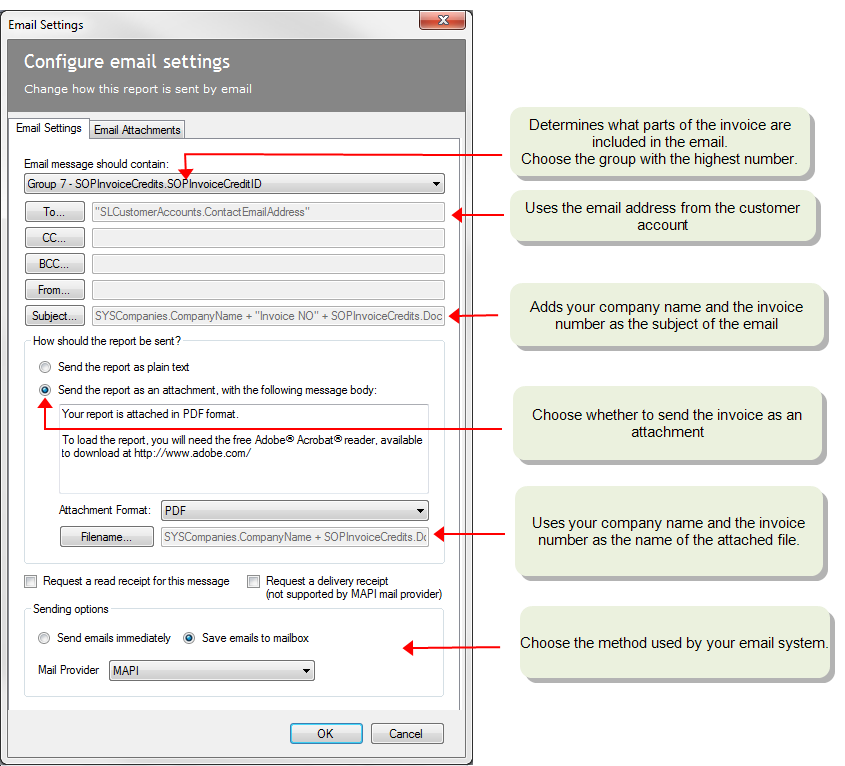
From the Email message should contain drop-down list, choose the group with the highest number (e.g. if there are 7 groups, select group 7). This makes each invoice is included on a separate email.
In this example, for the SOP Invoice (Single) layout, select Group 7 - SOPInvoiceCredits.SOPInvoiceCreditID.
Note: If you want to include your company logo, make sure that your logo is included the header section that you choose here.
-
Add the customer account email address. Invoices are sent to the address stored on the customer account.
Click To, then copy and paste this text in to the expression editor:
Invoices created from Invoicing or Sales OrdersCopySLCustomerAccounts.ContactEmailAddressFree text invoicesCopySAL_FREE_TXT_INV_AFD_5031.PX_CONTACT_EMAIL_ADDRESS -
Click Subject and enter the subject for the email.
This can be plain text, or you can use an expression to include details from Sage 200.
The following expression includes your company name and the invoice number. You can copy and paste this text into the expression editor:
Invoices created from Invoicing or Sales OrdersCopySYSCompanies.CompanyName + " Invoice No:" + SOPInvoiceCredits.DocumentNoFree text invoicesCopySYSCompanies.CompanyName + " Invoice No - " + SAL_FREE_TXT_INV_AFD_5031.PX_INVOICE_NUMBER -
Choose to send the invoices as an attachment.
- Enter the required message text.
- Set the Attachment Format to PDF.
-
Click Filename and enter a filename for the attachment.
This can be plain text, or you can use an expression to include details from Sage 200.
The following expression includes your company name and the invoice number. You can copy and paste this text into the expression editor:
CopyREPORT.DESCRIPTION
-
Select Save email to mailbox.
The emails are sent to your email drafts folder, so you can check them before sending to your customers.
-
Choose your email account provider.
-
MAPI: Select this if your email application uses a MAPI (Outlook / Exchange) mail server.
-
Microsoft Outlook: Select this if you are using Microsoft Outlook.
-
-
To save the new invoice layout, select File > Save As.
Note: When you change a default layout, letter or report, you must save the new layout, letter or report in the custom or company folder.
Add the Pay Now button
-
Add the Pay Now image to the layout.
- Select Toolbox > Add Pay Now Button.
-
The PayNowMessage and Pay Now button are added to the report footer.
-
After you've finished editing, save the layout.
- If you want to use the layout for all companies, make sure you save it in the Custom > Layouts folder.
- If the layout is for a specific company (if you have more than one on your site), save it in the Company > Layouts folder.
Note: If this a new layout, don't forget to assign set it as a default layout, or assign it to the relevant customer accounts.
Tip: To change the Pay Now message, see Change the text displayed on invoices.
Send invoices with Invoice Payments (Pay Now)
Use Pay Now with Opayo (formerly Sage Pay)
Email invoices (from sales orders)
Email invoices and credit notes (from Invoicing)
Print sales orders, returns, invoices and credit notes
Add an image in Report Designer (video)
Add a line in Report Designer (video)
Add a text box in Report Designer (video)
Add a variable in Report Designer (video)
Add totals in Report Designer (video)
Printer settings in Report Designer (video)
Conditional formatting in Report Designer (video)
Expressions in Report Designer (video)
Functions in Report Designer (video)


